Contents - Index - Previous - Next


Draw Cartridge


If all of the component dimensions and data are entered for the selected load, the software can produce an image of the loaded cartridge  and also a sectioned drawing of the cartridge, showing a scaled image of the various components of the load.  

Before complete, accurate drawings can be produced, the following procedures must be completed.
  • Values in the Cartridge Dimension Panel and the Case Volume panel on the "Edit Case Data" page of the Cartridge Case Database Control Module must be entered and  then the cartridge record loaded from the "Select Case" page into the Load Data Cartridge Panel. The Cartridge Over All Length must be recorded in the Cartridge Panel.

  • Values in the Bullet Profile Panel, located on the Edit Bullets page in the Bullet Database Module, must be entered and then the bullet record loaded from the "Select Bullet" page into the Load Data Bullet Panel. 

  • A primer record must be loaded into the Primer Data Panel from the Primer Database Module.

  • The Specific Gravity of the powder must be entered or calculated in the Powder List Module and then loaded from the "Select Powder" page into the Powder Data Panel. The Powder charge in grains must be recorded in the Powder Panel.

  • After all the data has once been entered into the various component modules, there should be no need to do so again.

  • After changing from one firearm to another, it may be necessary to go to the Bullet Panel and open the Bullet Database. this will position the proper bullet selection for the drawing of the cartridge sketch.
  • Remember all values in the sketch are acquired from the various component databases and must be loaded from those databases into the Load Record Component Panels for the drawing process to work correctly.


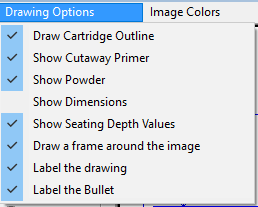
    Various drawing styles, labeling options and colors may be controled using the options available from the menu items at the top of the drawing application.


    Clicking  the button titled  "Draw a Sectioned Case" will create a sectioned drawing, showing the relationship of the interior cartridge components.

    The various radio buttons , check-boxes and buttons may be manipulated to change the drawing styles, labels, colors and gradient type in the sketch.

    The Bullet Type Radio Button Box cannot be uses to change the style of the bullet. It only indicates what the style of bullet is in the selected load.


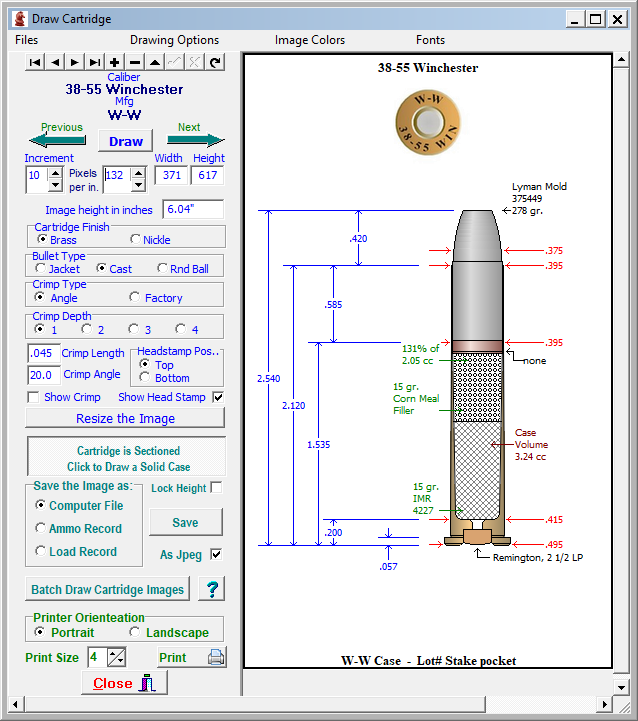
    The Gradient Scale at the left of the image may be used to move the highlight of the gradient color of the case and bullet. With some styles of bullet, the extreme ends of the scale may cause a gradient error. Simply move the scale toward the center position until the gradient color will draw or select a more narrow range between starting and ending gradient colors.

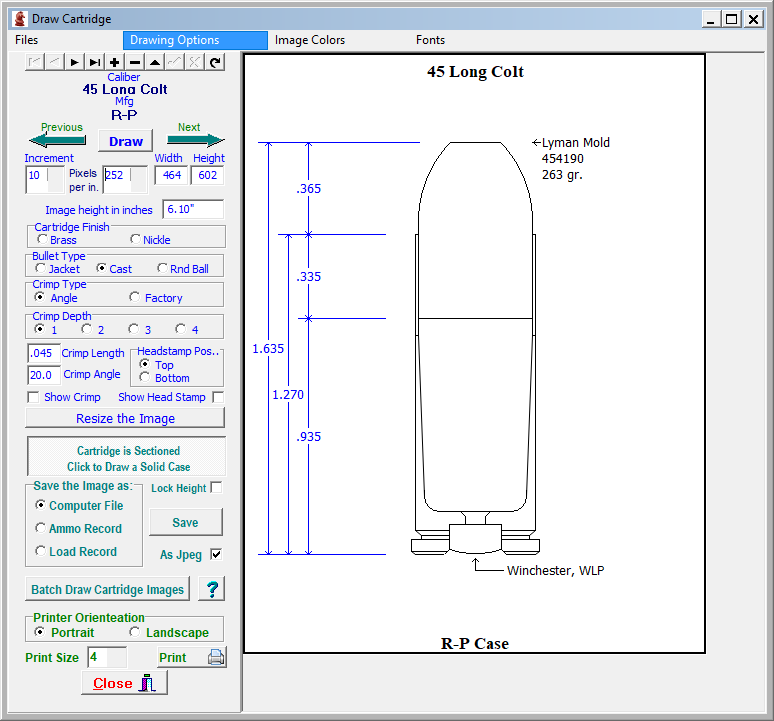
    Check the "No Color" checkbox to produce a line drawing of the cartridge.


    After drawing, the image may be saved to three seprate locations:

    1. The Load Record.  
        The data contained in each load record may be  printed onto a hard copy. The image, as drawn, may be saved to the load record and the printout will display the image along with the load and target data.

    2. The Loaded Ammunition database. 
         If the selected load is entered into loaded ammunition database the image, as drawn may be stored and displayed in the Loaded Ammunition application.

    3. As either a bitmap or jpeg image in a folder on the computer.
        The image height may be adjusted using the spin edit boxes at the top of the application then check the box titled "Lock Height" to draw the image to be save at the desired height.


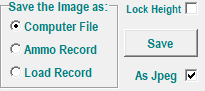
    Select the Save-to location then click the "Save" button.

    If may images are to be drawn and saved,  click the    to open the Batch Draw application. Clicking on the " ? " button will open a printable instruction sheet concerning the Batch Drawing Application

    The drawn image may be printed either as a portrait or landscape orientation in 5 scale sizes.

    Copyright © 2002- 2016. TMT Enterprises. All rights reserved. Modified June, 2016