Contents
- Index
- Previous
- Next
Firearm Chamber Specifications
The Load Record Active Bullet List has a provision which calculates a bullet seating depth that will position the bullet ogive or front shoulder to just touch either the forcing cone or the rifling lands. Chamber dimensions that are more precise and detailed than are provided on the Firearm Record Page are required for these calculations. This page may be used to enter and record the precise values needed to calculate the exact overall cartridge length.
If one is very experienced in using Cerrosafe, accurate chamber dimension value can be determined by using the chamber cast. A mixture of sulfur and graphite may also be heated and used to make a stable chamber casting. However, using the casting methods, it is difficult to obtain an accurate chamber length value.
A pound slug works very well, is easy to do and accurately retains all of the necessary dimensional values needed for bullet fit and cartridge over all length.
The pound slug is made using a case fired in the chamber to be measured and either pouring it nearly full of lead or placing a close fitting dowel in the cartridge that reaches to within about 0.025" from the mouth of the cartridge and a cylinder of pure lead slightly smaller than the bore diameter and about 1.5" to 2" long. Clean and lightly oil the chamber and bore then chamber the cartridge and close the action. Drop the cylinder of lead down the bore from the muzzle and, using a brass or steel rod wrapped at intervals with electrical tape, pound the lead slug down into the cartridge case, expanding the slug into the throat and rifling area. The point of full slug expansion can be determined by the sound generated while pounding. Open the action while lightly tapping the rod to extract the pound slug. A long cast bullet may be used but traces of the existing lube grooves will be present on the slug and may not provide an exact mirror image of the chamber. If possible, use lead wire of the appropriate diameter or bore a hole with a diameter slightly smaller than the rifle bore in a piece of wood and pour molten lead into the cavity. If a long fishing sinker of the right diameter can be found, that might also work. Pure lead works best. Bullet alloy may be too hard to make an exact impression of the chamber.
Click on the Page Tabs and picture in the image below to open context sensitive help topics
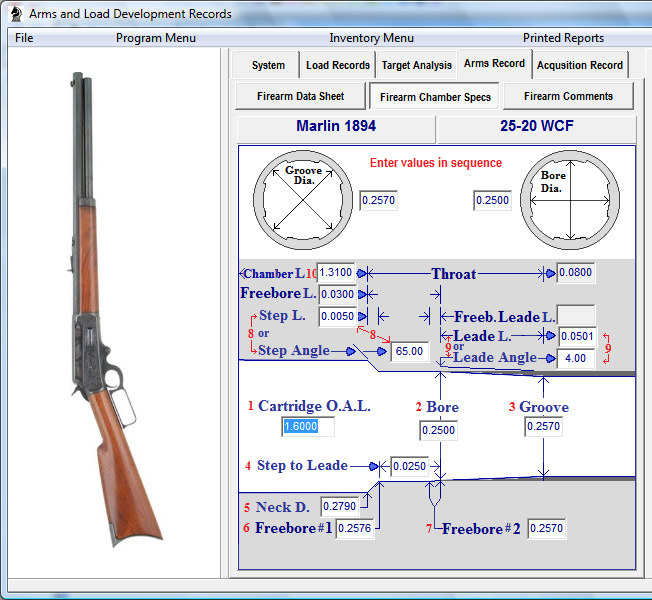
Enter the following values in the sequence listed.
Start at #1 and use the Tab key to step through the sequence.
The fields that are light gray in color will be calculated from the values.
1. Cartridge Overall Length: Enter the maximum cartridge length that will work through the selected firearm's action and chamber.
2. Bore Diameter: The distance from the top of a rifling land to the top of the opposite land.
3. Groove Diameter: The distance from the bottom of one rifling groove to the bottom of the opposite groove.
4. Step to Leade: Enter the distance from the end of the step-down from the chamber neck to the point on the free-bore where the leade cone begins. Do not include the length of the step down. If the forward end of the free-bore is greater in diameter than the groove diameter, a short cone, or free-bore-leade will be formed. Do not include the length of this free-bore-leade in this distance. If there is no free-bore, enter a value of " 0 ". Enter only the distance from the step to the beginning of the leade cone. The software will calculate the step-to-lead length and the free-bore-leade length from the angles of the cones.
5. Chamber Neck Diameter: This is the diameter of the forward end or neck of the chamber, just before the step-down to the free-bore diameter.
6. Free-bore Diameter #1: The diameter of the free-bore at the end of the step-down from the chamber neck diameter. The Free-bore may be slightly tapered, if so, enter the end diameter in the Free-bore #2 field. If no free-bore is present, enter the Groove Diameter value in this field.
7. Free-bore Diameter #2: The diameter of the free-bore at the point where the Leade cone begins. This diameter is usually the same as the #1 diameter but may be tapered down to the groove diameter. Enter the diameter of the free-bore where the Leade cone starts. If no free-bore is present, enter the Groove Diameter value in this field.
8. Step Length or Step Angle: Use the Step Length to calculate the Step Angle or use the Step Angle to calculate the Step Length. After entering a value and then, upon exiting the field, using the Chamber Neck Diameter and Free-bore Diameter #1, the software will calculate the alternate field value and also the total throat length.
9. Leade Length or Leade Angle: Use the Lead Length to calculate the Leade Angle or use the Leade Angle to calculate the Lead Length and Free-bore Leade Length. After entering a value and then, upon exiting the field, using the Free-bore Diameter #2, the Groove Diameter and the Bore Diameter, the software will calculate the alternate field value and also the total throat length.
10. Chamber Length:
Free-bore Length: This is a calculated field and represents the distance from the chamber mouth to the start of the rifling lands and includes the step-down length and any free-bore leade that may be present.
Free-bore Leade Length. A calculated field which records the length of the Leade cone that is formed if the free-bore is larger than the Groove Diameter.
Throat Length. The last calculated field which totals the lengths of the Step-down, Free-bore, Free-bore Leade and Rifling-leade.
~
The Load Record Active Bullet List Does not calculate the overall cartridge length base upon throat fit in revolver cylinders. It uses either a recorded maximum OAL Cartridge length or will calculate OAL from case length and bullet configuration. However, recording the cylinder's chamber, leade and throat configuration dimensions is useful when determining the choice of bullets used in various loads.
A revolver cylinder chamber impression can be made by simply placing the cylinder face on a block of wood. Then place a slug of lead in one of the chambers and, using a hardwood dowel or brass rod, pound the slug until it fills the leade and throat area. Tap out the slug from the throat end. The slug need not fill the whole chamber as the chamber length can obviously be measured end to end from the cylinder.
Click on the Page Tabs and picture in the image below to open context sensitive help topics
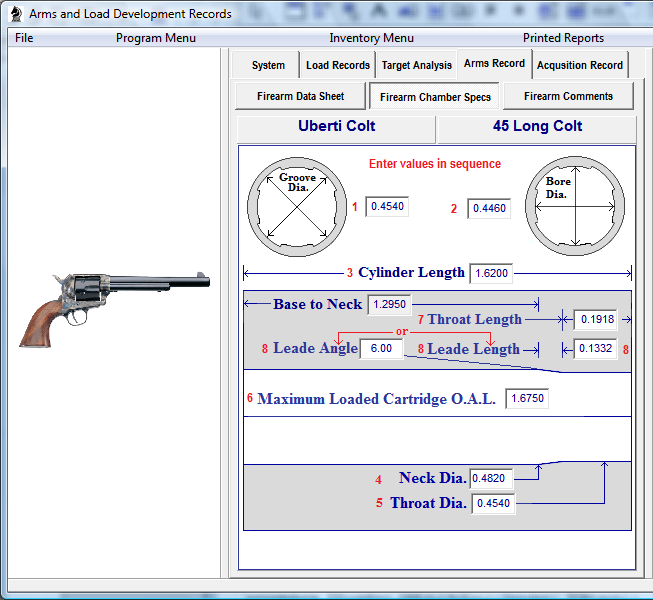
1. Bore Diameter: The distance from the top of a rifling land to the top of the opposite land.
2. Groove Diameter: The distance from the bottom of one rifling groove to the bottom of the opposite groove.
3. Cylinder Length: Record the distance from the rear to the front face of the cylinder.
4. Neck Diameter: The diameter of the chamber mouth at the start of the cylinder leade.
5. Throat Diameter: Use a pound slug or a bullet driven through the cylinder throat to determine this value.
6. Maximum Cartridge Over All Length: Unless the cylinder is rebated for cartridge rim depth, this value will be different from the cylinder length. Add rim width and head space values to the cylinder length to determine this value.
7. Throat Length: Use a pound slug or chamber cast to determine the distance from the cylinder face to the end of the Lead .
8. Cylinder Leade Angle or Leade Length. Use the Lead Length to calculate the Leade Angle or use the Leade Angle to calculate the Lead Length and Base to Neck distance. After entering a value and then, upon exiting the field, using the Neck Diameter and the throat Diameter, the software will calculate the alternate field value and also the Base to Neck distance value.
Copyright © 2002- 2016. TMT Enterprises. All rights reserved. Modified June, 2016