Contents
- Index
Batch Drawing Application
Batch Draw a group of Cartridge or Load Images
The batch draw form will step through a selected number of load records, drawing and saving each image to either viewing images in the Load Record database or as JPEG images within a specified computer folder.
While still in the Draw Cartridge Application
The loaded cartridge viewing images may be saved one at a time into the Loaded Ammunition Database records.
Select the radio button titled "Ammo Record" then click "Save". Batch drawing is not available for this feature.
Set up the image options using the radio button boxes and check-boxes.
Open the Drawing Options menu for additional image options.
To draw an image with a sectioned case, showing bullet and powder relationship, click the button titled "Click to Draw a Sectioned Case"
To draw an image of a whole cartridge, click the button titled "Click to Draw a Solid Case"
Drawing and saving viewing images within the Load Record Database:
In the "Save the image as:" box, select the "Computer File" radio button.
Use the spin-edit windows at the top left of the form to select the desired height of the images.
Check the "Lock Height" check-box.
Click the button titled "Batch Draw Cartridge Images".
Drawing and saving Jpeg images to a folder on the computer:
In the "Save the image as:" box, select the "Load Record" radio button.
Click the button titled "Batch Draw Cartridge Images".
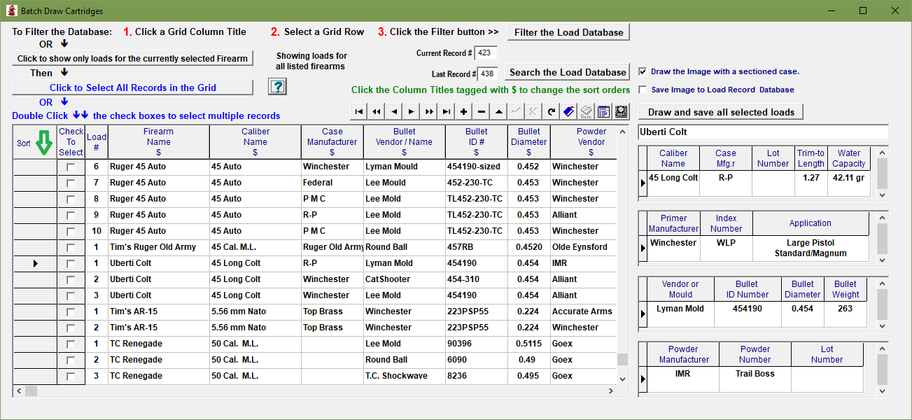
Within the Batch Drawing module:.
The database grid is set up to rearrange, sort, filter and search component fields for records to select into a batch drawing group.
To filter the database for a component or value range, click on a Grid column header to sort the values in the column, select a value or name in that column then click the button titled "Filter The Load Database".
After the database is filtered, select the loads to be imaged by double-clicking in the check-box at the left of each record. Or click the button titled "Click to Select all Records in the Grid".
Or, click the button titled "Click to show only loads for the currently selected Firearm" then click the "Select All Records" button.
Individual records may be further organized by double-clicking the check-box at the left of each record.
Use the database navigator bart to step through your selections and check each component grid at the right of the main database grid to ensure that all components are visible for each load.
If a component is missing, either uncheck the load record or cancel the load filter then go to the Load Records data entry and ensure that the missing component is re-downloaded from the component database into the load database.
Return to the Batch draw and run the filter again to endsure that the component is visible in the individual component grid.
The check-boxes at the right of the form should be checked or unchecked to conform to your save destination and drawing style.
Finally click the "Draw and save all selected loads" button/
Depending on the number of loads selected to be drawn and saved, the drawing and saving process may take some time to complete.